Agregar menú contextual de configuración en Windows 10
Cómo agregar el menú contextual de Configuración en Windows 10.
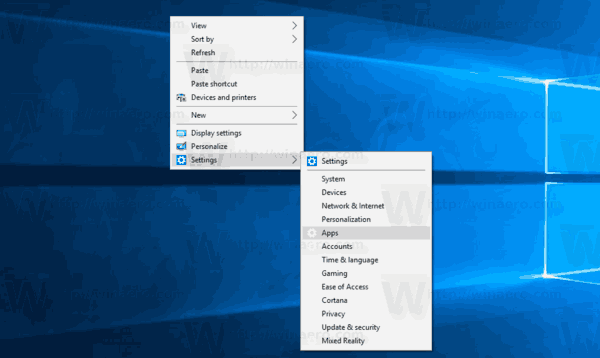
En este artículo, veremos cómo agregar cualquier página de Configuración al menú contextual en Windows 10. Para que pueda probar esta capacidad, crearemos un menú contextual especial con categorías de la aplicación Configuración y lo agregaremos al Escritorio.

los Aplicación de configuración en Windows 10 reemplaza el Panel de control clásico. Consta de muchas páginas y hereda muchas configuraciones clásicas. Casi todas las páginas de configuración tienen su propio URI, que significa Identificador uniforme de recursos (URI). Comienza con el prefijo 'ms-settings' (protocolo).
Anuncio publicitario
Como recordará, cubrí el comandos ms-settings en Windows 10 que puede usar para abrir varias páginas de la aplicación Configuración directamente. Consulte los siguientes artículos para obtener más información sobre ellos.
- Comandos ms-settings en Windows 10 Fall Creators Update
- Comandos ms-settings en Windows 10 Creators Update
- Abra varias páginas de configuración directamente en Windows 10 Anniversary Update
- Cómo abrir varias páginas de configuración directamente en Windows 10
Recientemente, descubrí que es posible usar los URI de ms-settings en los elementos del menú contextual. El siguiente artículo demuestra este truco en acción:
Agregar menú contextual de Windows Update en Windows 10
En resumen, vea el siguiente ejemplo:
[HKEY_CLASSES_ROOT \ DesktopBackground \ Shell \ WindowsUpdate] "MUIVerb" = "Actualización de Windows" "Icon" = "% SystemRoot% \\ System32 \\ bootux.dll, -1032" "SettingsURI" = "ms-settings: windowsupdate" [HKEY_CLASSES_ROOT \ DesktopBackground \ Shell \ WindowsUpdate \ command] "DelegateExecute" = "{556FF0D6-A1EE-49E5-9FA4-90AE116AD744}"
Puede especificar el valor de la cadena SettingsURI en el identificador del menú contextual y establecerlo en el comando ms-settings deseado. Un objeto especial {556FF0D6-A1EE-49E5-9FA4-90AE116AD744} llamado desde la subclave de comando realiza la operación. Por lo tanto, las páginas de la aplicación Configuración se abrirán de forma nativa.
Veamos cómo agregar el siguiente menú contextual:

Agregar menú contextual de configuración en Windows 10
Para agregar el menú contextual de Configuración en Windows 10, Haz lo siguiente.
- Descargue el siguiente archivo ZIP: Descargar archivo ZIP.
- Desbloquear el archivo.
- Extrae su contenido a cualquier carpeta. Puede colocar los archivos directamente en el escritorio.
- Haga doble clic en "Agregar configuración Menú contextual.reg" expediente.
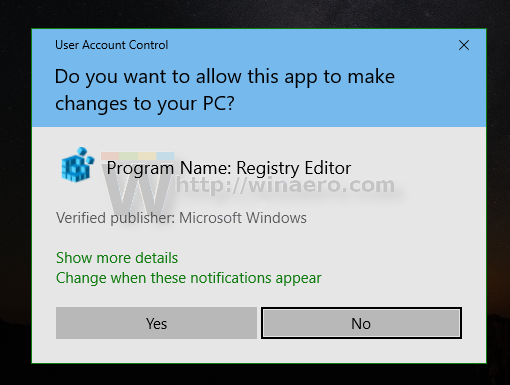
- Confirme UAC haciendo clic en Sí.

- Haga clic derecho en el escritorio para ver el nuevo menú de Configuración que ha agregado.
Nota: El archivo ZIP que ha descargado también incluye un ajuste para deshacer, Eliminar el menú contextual de configuración.reg. Haga clic en él para deshacer el cambio y eliminar el menú.
El menú contextual del escritorio incluirá las siguientes categorías de la aplicación Configuración:
- Ajustes
- Sistema
- Dispositivos
- Red e Internet
- Personalización
- Aplicaciones
- Cuentas
- Hora e idioma
- Juego de azar
- Facilidad de acceso
-
Cortana(eliminado en la versión 2004) - Intimidad
- Actualización && seguridad
- Realidad mixta
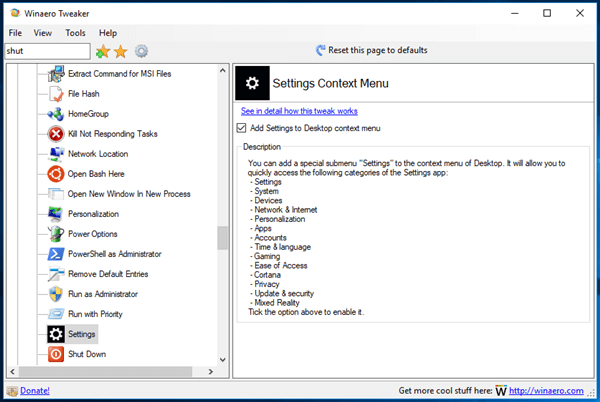
Alternativamente, puede utilizar Winaero Tweaker. Hay una opción en Menú contextual \ Configuración que puede habilitar para agregar el menú rápidamente.

Puede descargar Winaero Tweaker desde aquí:
Descarga Winaero Tweaker
El contenido del archivo de modificación del registro es el siguiente:
Editor del registro de Windows, versión 5.00 [HKEY_CLASSES_ROOT \ DesktopBackground \ Shell \ Settings] "Posición" = "Abajo" "Icon" = "SystemSettingsBroker.exe" "SubCommands" = "" [HKEY_CLASSES_ROOT \ DesktopBackground \ Shell \ Settings \ shell \ 01Settings] "Icon" = "SystemSettingsBroker.exe" "MUIVerb" = "Configuración" "SettingsURI" = "ms-settings:" [HKEY_CLASSES_ROOT \ DesktopBackground \ Shell \ Settings \ shell \ 01Settings \ command] "DelegateExecute" = "{556FF0D6-A1EE-49E5-9FA4-90AE116AD744}" [HKEY_CLASSES_ROOT \ DesktopBackground \ Shell \ Settings \ shell \ 02System] "CommandFlags" = dword: 00000020. "MUIVerb" = "Sistema" "SettingsURI" = "ms-settings: display" "Icon" = "% SystemRoot% \\ System32 \\ bootux.dll, -1032" [HKEY_CLASSES_ROOT \ DesktopBackground \ Shell \ Settings \ shell \ 02System \ command] "DelegateExecute" = "{556FF0D6-A1EE-49E5-9FA4-90AE116AD744}" [HKEY_CLASSES_ROOT \ DesktopBackground \ Shell \ Settings \ shell \ 03Devices] "MUIVerb" = "Dispositivos" "Icon" = "% SystemRoot% \\ System32 \\ bootux.dll, -1032" "SettingsURI" = "ms-settings: bluetooth" [HKEY_CLASSES_ROOT \ DesktopBackground \ Shell \ Settings \ shell \ 03Devices \ command] "DelegateExecute" = "{556FF0D6-A1EE-49E5-9FA4-90AE116AD744}" [HKEY_CLASSES_ROOT \ DesktopBackground \ Shell \ Settings \ shell \ 04Network] "MUIVerb" = "Red && Internet" "Icon" = "% SystemRoot% \\ System32 \\ bootux.dll, -1032" "SettingsURI" = "ms-settings: network" [HKEY_CLASSES_ROOT \ DesktopBackground \ Shell \ Settings \ shell \ 04Network \ command] "DelegateExecute" = "{556FF0D6-A1EE-49E5-9FA4-90AE116AD744}" [HKEY_CLASSES_ROOT \ DesktopBackground \ Shell \ Settings \ shell \ 05Personalization] "MUIVerb" = "Personalización" "Icon" = "% SystemRoot% \\ System32 \\ bootux.dll, -1032" "SettingsURI" = "ms-settings: personalización" [HKEY_CLASSES_ROOT \ DesktopBackground \ Shell \ Settings \ shell \ 05Personalization \ command] "DelegateExecute" = "{556FF0D6-A1EE-49E5-9FA4-90AE116AD744}" [HKEY_CLASSES_ROOT \ DesktopBackground \ Shell \ Settings \ shell \ 06Apps] "MUIVerb" = "Aplicaciones" "Icon" = "% SystemRoot% \\ System32 \\ bootux.dll, -1032" "SettingsURI" = "ms-settings: appsfeatures" [HKEY_CLASSES_ROOT \ DesktopBackground \ Shell \ Settings \ shell \ 06Apps \ command] "DelegateExecute" = "{556FF0D6-A1EE-49E5-9FA4-90AE116AD744}" [HKEY_CLASSES_ROOT \ DesktopBackground \ Shell \ Settings \ shell \ 07Accounts] "MUIVerb" = "Cuentas" "Icon" = "% SystemRoot% \\ System32 \\ bootux.dll, -1032" "SettingsURI" = "ms-settings: yourinfo" [HKEY_CLASSES_ROOT \ DesktopBackground \ Shell \ Settings \ shell \ 07Accounts \ command] "DelegateExecute" = "{556FF0D6-A1EE-49E5-9FA4-90AE116AD744}" [HKEY_CLASSES_ROOT \ DesktopBackground \ Shell \ Settings \ shell \ 08Time] "MUIVerb" = "Hora && idioma" "Icon" = "% SystemRoot% \\ System32 \\ bootux.dll, -1032" "SettingsURI" = "ms-settings: fecha y hora" [HKEY_CLASSES_ROOT \ DesktopBackground \ Shell \ Settings \ shell \ 08Time \ command] "DelegateExecute" = "{556FF0D6-A1EE-49E5-9FA4-90AE116AD744}" [HKEY_CLASSES_ROOT \ DesktopBackground \ Shell \ Settings \ shell \ 09Gaming] "MUIVerb" = "Juegos" "Icon" = "% SystemRoot% \\ System32 \\ bootux.dll, -1032" "SettingsURI" = "ms-settings: gaming-gamebar" [HKEY_CLASSES_ROOT \ DesktopBackground \ Shell \ Settings \ shell \ 09Gaming \ command] "DelegateExecute" = "{556FF0D6-A1EE-49E5-9FA4-90AE116AD744}" [HKEY_CLASSES_ROOT \ DesktopBackground \ Shell \ Settings \ shell \ 10Ease] "MUIVerb" = "Facilidad de acceso" "Icon" = "% SystemRoot% \\ System32 \\ bootux.dll, -1032" "SettingsURI" = "ms-settings: easyofaccess-narrator" [HKEY_CLASSES_ROOT \ DesktopBackground \ Shell \ Settings \ shell \ 10Ease \ command] "DelegateExecute" = "{556FF0D6-A1EE-49E5-9FA4-90AE116AD744}" [HKEY_CLASSES_ROOT \ DesktopBackground \ Shell \ Settings \ shell \ 12Privacy] "MUIVerb" = "Privacidad" "Icon" = "% SystemRoot% \\ System32 \\ bootux.dll, -1032" "SettingsURI" = "ms-settings: privacidad" [HKEY_CLASSES_ROOT \ DesktopBackground \ Shell \ Settings \ shell \ 12Privacy \ command] "DelegateExecute" = "{556FF0D6-A1EE-49E5-9FA4-90AE116AD744}" [HKEY_CLASSES_ROOT \ DesktopBackground \ Shell \ Settings \ shell \ 13Update] "MUIVerb" = "Actualización de && seguridad" "Icon" = "% SystemRoot% \\ System32 \\ bootux.dll, -1032" "SettingsURI" = "ms-settings: windowsupdate" [HKEY_CLASSES_ROOT \ DesktopBackground \ Shell \ Settings \ shell \ 13Update \ command] "DelegateExecute" = "{556FF0D6-A1EE-49E5-9FA4-90AE116AD744}" [HKEY_CLASSES_ROOT \ DesktopBackground \ Shell \ Settings \ shell \ 14Mixed] "MUIVerb" = "Realidad mixta" "Icon" = "% SystemRoot% \\ System32 \\ bootux.dll, -1032" "SettingsURI" = "ms-settings: holográfico" [HKEY_CLASSES_ROOT \ DesktopBackground \ Shell \ Settings \ shell \ 14Mixed \ command] "DelegateExecute" = "{556FF0D6-A1EE-49E5-9FA4-90AE116AD744}"Edítelo según sus preferencias. Agregue o elimine las páginas que desea tener en el menú contextual. Utilice los comandos disponibles en la lista de comandos ms-settings mencionada al principio del artículo para personalizar su menú contextual.
Nota: El ajuste para deshacer está incluido en el archivo ZIP.

